
My current security needs, as with most home owners, are primarily exterior security. I need to watch people around my house, not who is leaving the seat up or swiping cookies from the cookie jar at 3:00am. I will be installing wired cameras as apposed to wireless for three reasons; wireless cameras are more expensive, wireless cameras can be "snooped" on by nefarious types with wireless receivers, wireless cameras still require power witch means I would be running a wire anyway.
The first step in creating your camera setup is scoping your property and determining camera placement. What do you want to protect? Your car, your mailbox, your front door? In this sample, I will be installing a night-sight (Infra Red) camera to watch my porch. There are several other cameras being installed, but installation is basically the same for each one. Make sure when you are buying your cameras to buy ones that match the intended purpose of each placement (long range, IR, case color, size, etc).
The second step is DVR placement. Each of your cameras will need to have a wire run from them to the DVR. Make sure that you will have wire access to the DVR with appropriately sized holes to run your connections. The DVR location should also have access to power as both it and your camera power will be located here. If you want to connect your DVR to the network (optional), you will also need a network cable run to the DVR location. The DVR must be somewhat physically accessible whether it is in an office, hooked up to the TV in the living room or in a closet especially if you have opted not to hook up the network.
The items I have chosen for my own install are;
-
DVR
chosen for it's low cost, network connectivity, export functions, 8 ports for expandability and lack of hard drive (I have a spare that I will install).
- long range chosen for primarily for its night capability and case color (closely matches house).
- Several other cameras (small, long range, hidden) of different styles for other parts of the house with different specifications based on location and purpose, all cameras need to be rated for outdoor use.
- Pre-made cables for ease of install, available in various lengths (65ft, 100ft). Always err on the side of caution; cables that are too long are much preferred over cables that are too short.
- Power Supply chosen for amperage enough to run my cameras. If your power supply is not enough to run all your cameras, just buy more than one power supply.
- Power Splitter to connect a single power supply to multiple cameras.
INSTALLING A CAMERA
STEP 1: Drill a hole and drop a cable
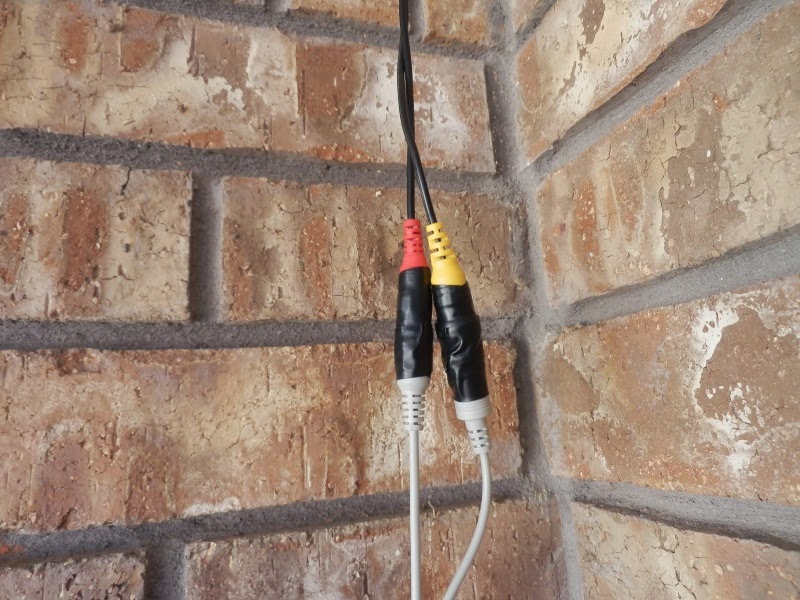
Using a test piece of wood I drilled a hole and made sure that I would be able to put the connectors of my cable through. This is an important step, because it would not be fun to find out your cables won't fit while trying to push them through from the attic. Once you have determined your hole size, place your camera to find an appropriate location for the cable hole, drill it and drop the ~camera end~ of the cable through the hole. The video connector (yellow) is the same at both ends, but the power connector (red) has a male and female end. Make sure you know which end goes to the camera and which end goes to the DVR before you run the cable.

STEP 2: Tape the connections
Technically an option, but an option that should be taken. Using electric tape to firmly tape both the power and video connections helps ensure corrosion resistance from humidity as well as helping ensure the connections do not slip apart. Make sure to adequately seal all exposed metal portions of the connectors to make sure they won't short out if knocked together.
STEP 3: Mount the camera
There are four screws on the base of this camera, front and back and the two sides. The screws on the sides are used to mount the camera. Simply run two corrosion resistant screws through the holes into the soffit. No need to get outrageously long screws as most soffits are only 1/4" thick.
STEP 4: Plug in the DVR
After running the ~DVR end~ of the cable back to the DVR, simply attach the video connector to the DVR and power connection to your power supply.
STEP 5: Adjust the camera
This step can be done with one person, but is easier with two. The screws in the front and back of the camera base can be loosened to allow repositioning of the camera. Once the camera is aimed at its desired target, simply tighten the screws down.

STEP 6: Admire your work
Notice the camera placement in the corner above the door. The color of the camera helps it blend into the environment and its location in a corner helps it both hide and at the same time have the best vantage point of the entire porch. Having not-so-obvious camera placements not only increases security by not allowing bad guys to know when they are being recorded but also helps your house not look like a maximum security prison.

-ciao
Informative information..!!Thanks for sharing this information about Security Cameras.
ReplyDeleteIt’s really great and interesting post you have shared about the CCTV camera. This blog provide the more information about the installation of CCTV cameras and also how to improve your security by CCTV camera. Thank you for this brief explanation and very good information.
ReplyDeleteThanks and Regards,
Jordan Caver
Home Theater Vancouver
Home Theater Toronto
This makes it less demanding for the specialists to get the robbers. Having other safety efforts set up if there should be an occurrence of a theft is certainly keen, yet the smoke detector camera will include an additional safety effort for guaranteeing they don't escape with taking your assets.Best smoke detector cameras
ReplyDelete